After purchasing a fanimation fan, the remote control comes in the package. You can control the fan from this brand easily and without even touching it.
In short, you can increase the speed, turn on or off the lights or set a timer to switch off the fan and light after a while by using the remote.
But Fanimation fans have a variety of remotes that are different in nature.
So, a lot of users want to know how do you operate a Fanimation remote control?
The ideal way to operate a Fanimation control is to find out the function of every button it has.
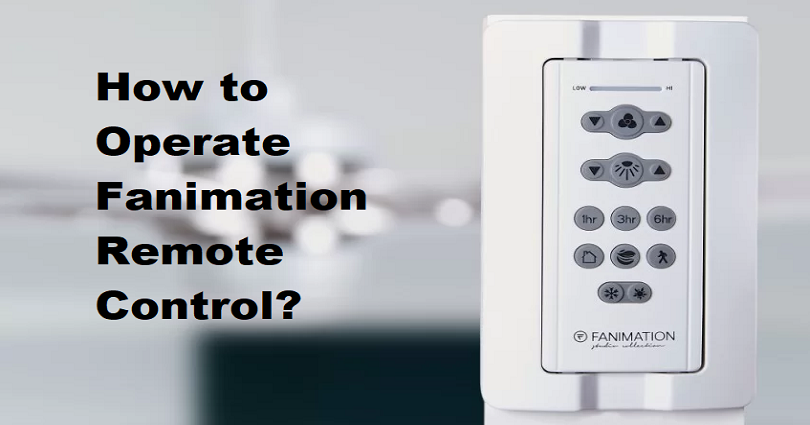
For instance, the Fanimation TW206 remote control contains a button displaying a person walking away. The function of this button is to delay the lights.
In short, if you are using the Fanimation TW206 fan in your living room and want to go to your bedroom at night, you can press the walkaway button one time. The light will be turned off after one minute by tapping on the button once.
Contents
How to operate a Fanimation remote control
The process of operating a fanimation remote will entirely depend on the type of Fanimation fan you have. However, here is a list of a few Fanimation remotes and a guide on how to operate them.
1. Fanimation FP6728 Series remote
The Fanimation FP6728 Series remote contains many buttons serving different functions.
- Bulb button – It is to turn ON/OFF the LIGHT and LIGHT DIMMER buttons. The light will be switched on or off by pressing and releasing the button. However, the light will dim or brighten if you press and hold the button, after releasing it, you will be at your desired level.
- Three dots – It switches ON the ceiling fan at a high speed.
- Two dots – This button turns ON the ceiling fan and sets it to a medium speed.
- One dot – It turns ON the ceiling fan and sets it to a low speed.
If you want to turn off the lights, the lights can be switched OFF on your Fanimation remote (FP6728 series) by tapping on the button with a circled square.
2. Fanimation TW206 remote
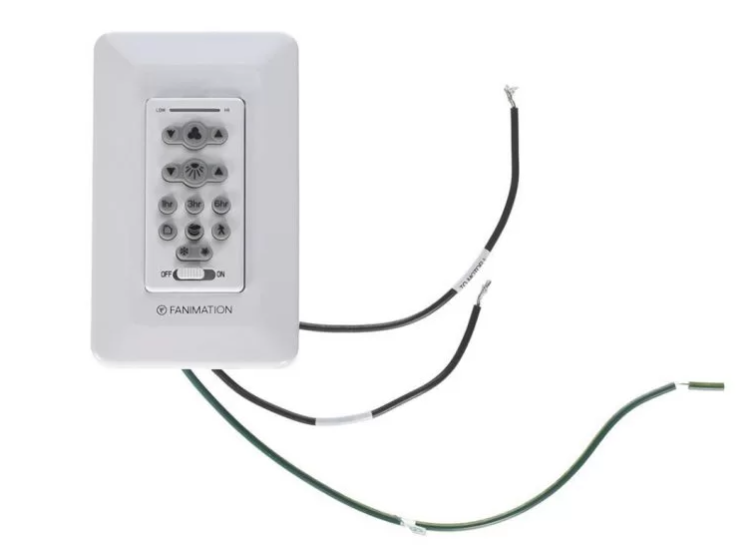
The Fanimation TW206 remote contains six rows of buttons with different functions.
- First row – It is an Indicator LED Light with LOW/HI labels. The purpose of this is to display the speed of the fan and the light dimmer indicator.
- Second row – It contains three buttons. The middle button switches OFF the fan, while the remaining two buttons with a triangle pointed UP and DOWN are the speed levels buttons. The left button with the triangle pointed up helps you to switch ON the fan and increases the speed UP, while the right button with the triangle pointing down switches ON the fan and decreases or DOWN the speed.
- Third row – This row contains three buttons in it. The middle button is called the light button, and the function of this one is to turn the fan’s light ON or OFF. The button on the left side contains a triangle UP icon, and it helps you to INCREASE the light output level. The button on the right side with a triangle DOWN icon helps you to DECREASE the light output level.
- Fourth row – Here, there are three Sleep Timer buttons. The numbers on the buttons will be (1hr, 3hr, and 6hr) to show you how long the fan and light will turn OFF after you press them. For instance, if you press the 1hr button, the fan and light will turn OFF after one hour.
- Fifth row –It contains three buttons that feature different functions. The button on the left with a house icon stands for the home shield button that switches OFF the fan, and when you are not near, the light will randomly turn ON and OFF. The middle button is the neutral breeze button that controls the speed of the fan to provide a natural breeze. Lastly, the button on the right is the walk away light delay button and it turns OFF the light after one minute.
- Sixth row – Contains two reverse buttons. The button on the left is for the winter season. It will run the fan clockwise if you press it and force the airflow to circulate warm air downward without a noticeable air. The button on the right is for the summer season that will rotate the fan anticlockwise and force the airflow to circulate cool air downward.
Fanimation TW206 remote has the same buttons as the Fanimation JY1004 and Fanimation CR500 remote control. That is why their functionality is also the same.
What happens when the ceiling fan won’t turn on with a remote?
If your Fanimation remote control won’t turn on the fan, you need to follow these steps:
- The first thing to do is to check that the remote’s batteries are not dead. If they are, replace them.
- The next thing is the placement that you have installed the batteries correctly.
- Make sure there is nothing blocking the remote’s way to the fan.
- Switch off the power from the circuit breaker to the fan, after that, examine the receiver of the fan to make sure that they are on the same settings as the remote.
- Use the fan’s instruction manual to reset the remote as well as the receiver.
After doing the above steps, if the ceiling fan won’t turn on with a remote, replace the remote and try again.
What is the learn button on a Fanimation remote?
Some Fanimation remotes come with a LEARN button inside the compartment of the remote’s battery and these models are the CRL4WH.
This button is very helpful when doing the beginning setup of the fan, especially when setting up the speed.
After completing the installation of the fan, you should restore power to it. After that, you need to open the battery cover and press and hold the LEARN button for 3 seconds with a sharp object.
It will switch OFF the fan and move to medium speed, showing that the learning process is completed. You must press the LEARN button within 1 minute (60 seconds) of restoring power to the unit.
How to reverse fan direction using a Fanimation remote
To reverse the fan direction from a Fanimation remote is very easy. Ideally, it requires the steps of pressing the Summer or Winter buttons from the remote.
However, some Fanimation fan remotes (Fanimation TR29 remote) come with only one reverse button that can do both jobs and it will turn the unit anticlockwise or clockwise.
Final Words
Your Fanimation fan can be controlled easily with the Fanimation remote. Each button on the remote is made for its specific function. For instance, the buttons can be used to increase or decrease the speed. Also, they can also turn the fan ON or OFF, reverse the unit, and dim or brighten the lights as well.

