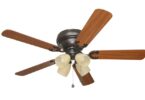
Harbor breeze offers great ceiling fans that can add beauty to your indoor areas as they are capable of generating massive airflow in your space especially on the hot scorching summer days.
If you want easy installation instructions for your Harbor Breeze fan then you need to continue reading this helpful guide.
It is replete with models but we have discussed some of them. For appropriate installation, you need to ensure that you have the right model and you can also find Harbor Breeze manuals on our website too for detailed instructions.
Contents
What Size Ceiling Fan Do You Need?
As a general rule you should choose the following size of ceiling fan keeping in view the size of your room or place:
- Get a 36-inch diameter ceiling fan if the dimension of the largest room is 12 feet or less.
- Get a 42-inch diameter ceiling fan if the dimension of the largest room is 12 feet to 15 feet.
- Get a 52-inch diameter ceiling fan if the dimension of the largest room is 15 feet to 18 feet.
Get Ready to Install Your Harbor Breeze Ceiling Fan
Read all the instructions available in the package of the fan to make sure that your ceiling fan is securely mounted to the ceiling. It is essential for your safety during the installation.
Ceiling fans are now used in exchange for existing lighting fixtures in your place, the wiring process should be completed by now.
Installation is not a hard nut to crack and the only right way to do it is to pay attention to the instructions.
If you need an additional wiring in order to install your Harbor Breeze fan and you are not familiar with the wiring process, you should hire a professional to do the job. Check the wiring colors guide to understanding the code.
When dealing with electricity always:
- Firstly, turn off the electricity from the circuit box (main fuse box) that controls the electricity to the room you are going to work in.
- Use the tester to make sure the power is turned off.
- Place the wall switch in the OFF position.
- All electrical connections must be connected keeping in view the codes. Check the local authorities to see if a permit is needed for it.
- If you have any doubts, clear them by consulting a professional.
- Do not use the bulbs with more wattage than specified.
A Piece of Advice:
Do not use a fan with any solid state speed control device unless it is specifically designed to use with a fan in order to reduce the risk of fire or electric shock.
Use a securely fastened metal box to mount the ceiling fan instead of mounting it to a plastic electrical box.
Check the Manufacturer’s manual that has the instructions for safety, warning and caution.
Harbor Breeze Ceiling Fan Mounting Options
Harbor Breeze ceiling fans blades must be mounted at least 7 feet above the floor and it is the appropriate distance.
The blade’s tips should not have any obstruction within the span of 24 inches if you want to get the maximum efficiency.
An outlet box securely attached to the building structure is needed. Change the old box with the new name as approved for ceiling fans or ceiling suspended paddle fan installation.
The box and its support must be able to support the weight of the fan while moving the fan. Additionally, use the installation hardware suggested by the manufacturer of junction box.
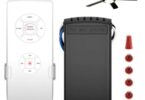
If the ceiling fan is more than 35 pounds in weight, with or without accessories needs additional support. If you are looking for replacement parts for Harbor breeze, check this article on: Harbor Breeze replacement parts: ceiling fan light kits, remotes.
Secure the new box to a brace between ceiling joists. If the wood brace between the joists is not a 2-by-4 but framing is accessible to you through the attic, add a brace.
Otherwise, you need to install an expandable metal ceiling fan hanger bar. These may be arranged from the attic or from below the ceiling, through the rough opening. Use a U-bolt to secure the box to the bracket.
How to Install the Mounting Bracket for Harbor Breeze Ceiling Fan
If the mounting bracket is properly installed, it makes sure a safe and efficient ceiling fan. Follow this step by step guide to install the mounting bracket correctly:
Step 1: Remove Harbor Breeze Fan Motor Screws
The first step is to remove the fan motor screws. These screws will be helpful to secure the blade arms to the motor later.
Step 2: Remove Mounting Bracket
The second step is to remove the mounting bracket from the fan canopy.
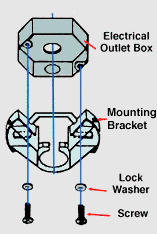
Step 3: Secure Your Mounting Bracket to Ceiling Electrical Box
Use the mounting screws to secure the mounting bracket to the ceiling electrical box and lock washers.
Install the mounting bracket with the J-hook toward the floor if the fan features a J-hook. It will support the weight of the ceiling fan motor housing so you can do the hands-free wiring installation.
Step 4: Electrical Wires
The next step is to pull the electrical wires through the center hole of the mounting bracket.
Step 5: Make a Decision on Close Mount or Downrod Installation
Now if you have a ceiling fan that has 3 mounting options, you will have to decide whether you use flush mount (close mount) or downrod installation. Downrod installations can be used for standard as well as angled ceilings.
How to Install a Downrod for Your Fan
A downrod is an addition to the ceiling fan that can be used to hung the fan from high ceilings and it is available in a variety of lengths to accommodate every space.
Step 1: Installation of Downrod
The first step is to install the downrod into the mount with the ball end toward the ceiling.
Step 2: Electrical Wiring
Thread the lead from the motor through both down rod and canopy. You need to be careful and do not pull the electrical wires.
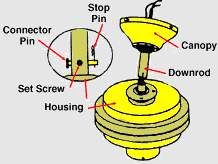
Step 3: Insert Downrod into Collar Yoke
The next step is to insert the downrod into the collar yoke and rotate it until the holes match. After doing so, insert the connector pin through the holes and secure with the help of a cotter pin. Careful while dealing with fan wires and do not damage or cut them.
Bend the two legs of the cotter pin to make sure that the connecting pin is not slipping out.
Step 4: Attach Downrod to Motor Assembly
Attach the hanger and downrod to the motor assembly by tightening the screws available on the side of the downrod. Some of the ceiling fans come with two set of screws.
Step 5: Hanger Bracket
Now put the ball into the hanger bracket. Hanger bracket has a tab opposite to its opening that should fit into the slot on the ball. Make the wire connections in a suitable manner.
Step 6: Attaching Canopy
After making the connections, tuck the wires into the outlet box carefully. Now ensure the tab at the bottom of the hanger bracket is placed on the groove of the hanger ball. Slide the canopy up the hanger bracket and affix it with the provided screws permanently.
If you need more instructions/information, you can get the Harbor Breeze Ceiling Fan Manual, locate your unit and get the manual.
Harbor Breeze Ceiling Fan Flush Mount Installation – (Step by Step Guide)
Some ceiling fans come without downrod installation and it enables the fan to mount it closer to the ceiling.
Step 1: Remove Screws
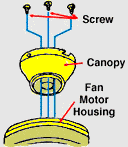
From the top of the motor housing of fan, remove the larger screws and lock washers.
Step 2: Secure Canopy
Use the same screws to secure the canopy to the housing.
Secure the canopy to the housing using the same screws.
Step 3: Hang Ceiling Fan
Use the J-hook (if applicable) to hang the ceiling fan and you can do it by using one of the holes at the top of the canopy.
Step 4: Wire Connections
Now make the wire connections in an appropriate manner. Find the hot and common wires by colors, blue wire is used for the light kit, black is used for the ceiling fan white is common for the fan & light kit and green is ground.
In all cases, ensure that all the exposed wiring is secured inside the wire connectors for safety. After the completion of wiring, push the wires into the electrical box in a gentle manner.
After making the connections and tucked the wires carefully into the outlet box, remove the canopy from the J-hook on the mounting plate.
Step 5: Attach Canopy Permanently
Use the available screws to attach the canopy to the mounting plate permanently.
How to Attach Harbor Breeze Ceiling Fan Blades
Use the screws and washers to mount each blade bracket to the blade of the fan. Tighten each screw one by one.
Repeat the same process for the rest of the blades. Follow the same procedure to mount each bracket/blade assembly to the unit.
Ensure all the screws are tightened securely to avoid any future issues.
How to Add a Light Kit to Your Ceiling Fan in 5 Easy Steps
If your Harbor Breeze ceiling fan has a light kit, it may already be wired, you just need to install the bulbs and globes. In some cases, you may have to wire the light kit by yourself.
Step 1: Removing Ceiling Fan Cover Plate
The first step is to remove the switch housing cover plate from the unit.
Step 2: Removing the Plug
Now it is time to remove the plug available at the center of the cover plate.
Step 3: Light Kit Wiring (Feeding)
Put the wires (black and white) of the light kit through the holes in the cover plate and tighten the plate to the light kit using the screws to avoid the loose vibration.
Step 4: Electrical Wiring for Light Kit
Find the two wires (blue and white) available in the switch housing labeled for light. Use the wire connectors to connect them to the light kit wires – blue to black and white to white.
Use the electrical tape to secure the connections and avoid loose vibration while operating.
Step 5: Attaching Light Kit to Housing
Lastly, push the wires back into the switch housing carefully and attach the lighting fixture to the switch housing with the help of the screws.
If you are still having issues, use the user manual or contact a professional to get the job done.
Harbour breeze ceiling fans are one of the best ceiling fan brands to consider while shopping. Do not forget to share this post with others to encourage our hard work.
If you have a ceiling fan installed and want to uninstall it, check out how to remove old ceiling fan to take it down and install the new unit.