Whenever you think of trying anything that involves electricity, you should know that it does not have any human friends. Once it catches you, it can kill you. That is why we have written this guide on how to take down a ceiling fan safely.
Ceiling fans are an absolutely important household need for every tom, dick and harry. When it comes to deal with the hot summer days, they keep the rooms cool, provide comfortable surroundings, and you can enjoy your sleep in the bedroom at the optimum temperature of the room.
However, at times you may want to take the ceiling fan down. It is due to the replacement of the ceiling fan with a modern design, your current ceiling fan is outdated or you are catching up with the trend. At times, cleaning and maintenance are another issue, you need to go through the mechanism of the ceiling fan. Whatever the purpose is, you need to know how to take down a ceiling fan, additionally, how to do it safely.
Also, check: how many blades are best on a ceiling fan?
Contents
What You Will Need
Before you start removing your ceiling fan, you need to bring together all the tools you need. Some tools will depend on the type of fitting your existing ceiling fan has, it includes light kits, whether your fan has built-in lights or later you have installed them. In general, you will need:
- A step ladder
- A screwdriver or Allen key
- Non contact voltage tester
Related read: Hampton Bay Ceiling Fans
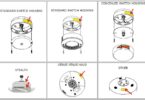
How to Remove A Ball And Socket Ceiling Fan
- First of all, switch off the electrical power from the electrical panel.
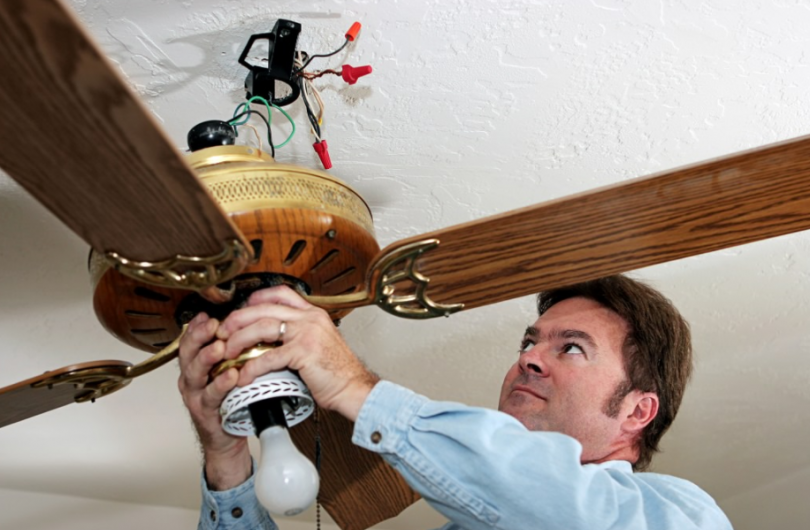
- With the help of a step ladder, remove the metal canopy encompassing the mounting bracket. Unscrew the screws to remove it, and keep in mind you may need to use a short screwdriver to unscrew all the screws. Lower the canopy to rest on the ceiling fan.
- Use the voltage tester to make sure there is no electrical current.
- Now, remove the wire nuts, and the wires. Put the nuts back on the wires coming from the ceiling as it will save you from accidents if you have to turn on the power.
- Hold the ceiling fan tightly, and slide the ball located at the top of the fan pole out of the mounting bracket.
- Lower the fan to the ground, or pass it to a helper/spouse, if you have one, it is preferable to get additional help.
- Usually, the mounting bracket is attached to the electrical box with two screws. Unscrew them and remove the bracket. Now put the screws back into the electrical box to ensure they don’t get lost.
Great read: Harbor Breeze Ceiling Fans with Reviews
How to Remove A Flush Mounted Ceiling Fan
The steps to uninstall a flush mount ceiling fan are different as compared with the previous type of ceiling fan. Flush-mounted ceiling fans need to be taken apart more before you take it down from the ceiling. However, there are some steps that are same. The first thing is to ensure that there is no electricity passing to the ceiling fan before you start the task. Always ensure that you can reach the fan safely with the help of a step ladder.
- Switch off the power going to the fan
- Now, use a step ladder, reach the ceiling fan, and remove any and all light bulbs and light bulb covers
- If your existing ceiling fan has a lighting fixture, remove it. The light kit is often separate, the removal process can differ from model to model. Most models are constructed with a separate section for the light kit so it can be removed with ease. Unscrew all the screws around the light kit using a screwdriver, and disconnect the wires. You should also use a voltage tester to ensure that there is no current going to the fan.
- Remove the fan blades with the help of a screwdriver. Most ceiling fan blades have two sets of screws – one affixed with the blade to the bracket, and a second attached to the bracket to the fan body. You need to only unscrew the screws from the bracket to the body with the help of a screwdriver.
- The next step is to unscrew the screws holding the body to the ceiling, but make sure you have a tight grip on the ceiling fan.
- Many modern design ceiling fans have screws on one side of the bracket, and a hinge on the other. Use a screwdriver to unscrew the screws, and permit the fan to hang while still it is connected to the hinge.
- Remove the wire nuts and disconnect the wiring.
- Now, remove the body of the fan from the hinge. Most hinges are designed with a small bar that slips out to disconnect the hinge. Lower the body of the fan to the floor, or pass it to a helper or friend, it is sensible to have one.
- The next step is to remove the mounting bracket on the ceiling. Use a screwdriver to unscrew the screws connecting it to the electrical box in the ceiling. Lastly, put the screws back inside the electrical box.
Safety Tips
There are safety tips one should take into consideration when working with electricity within your home.
- Most circuit breakers will have separate circuit breakers for each area of your home. If you are unable to locate the right one, shut down the main circuit breaker. Some circuit breakers come with a lock that can stop others from turning the breaker back on. If your circuit breaker has a lock, use it.
- If your home has an older model fuse panel, remove the fuse. If you are unable to find the right circuit, turn off the power to the whole house. Keep one hand in your pocket when removing the fuse, so that you’re not handling the fuse with both hands.
- You may also want to leave a message at the distribution box to let any electrical professional know that you are working on the circuit.
- Always double-check that the circuit is dead before you start working on any wires. Use a socket tester, or a voltage tester for this purpose.
- As rubber doesn’t have the ability to conduct electricity, wear rubber-soled shoes or boots to begin.
- Ensure that you use high-quality tools, such as screwdrivers, and pliers, as cheaper quality tools may snap or break, resulting in accidents.
- Lastly, you need to ensure that your tools have rubber-coated handles to help prevent any electricity from going through your body.
Last words
We hope that you liked the ultimate guide on how to take down a ceiling fan.
What is Next?
Do you want to install a new fan after removing this one, read our how to install article.
We have also discussed in detail how safe or dangerous ceiling fans are in another guide.
We also have a brand-specific guide on how to uninstall the Hampton Bay ceiling fan here.