Ceiling fans are adaptable electrical fixtures that can add cool air, lighting, and also provide warm air in a place like a bedroom, kitchen, or office. They are easy to install it is because most of them come with a user manual to get all the information. Before you get started, you need to go through the safety rules and understand the different types of ceiling fan wire colors code.
All wires that are in a ceiling fan have a specific function, each enables the ceiling fan to work smoothly and makes sure safety. It may be a challenging task to perform when it comes to wiring a ceiling fan, at times, it depends on the type of ceiling fan you buy or how it will work. Understanding the wire colors of a ceiling fan makes things easier for you.
Contents
Ceiling fan Wire Color Code
The most advanced ceiling fans from the different brands are designed with up to four wires. You can also get the ones with fix or six wires, keeping in view the task of the unit.
The four ceiling fan wire colors and their functions are:
1. White wire
The white wire is a neutral one that performs the function of completing an electrical circuit for a household ceiling fan.
While installation of the item, connect the white wire to an earth ground or any other neutral wire in the electrical wiring of your home.
2. Black wire
It is a live wire that can be used as the power feed for the outlet of the fan or power feet. The wire can be used in a circuit breaker as the switch leg.
It is the primary connection that offers current from the switch to the electrical load or motor of the ceiling fan.
3. Red wire
You may see a red wire while wiring a ceiling fan with other wires. The purpose of red color wire on ceiling fans is to power the lights. It is a hot wire that comes from the ceiling and engages with a wall switch. It works as a conductor to transmit power to the lighting kit when it is in your device.
4. Green Wire
The wire can be green or copper in color, it depends on your ceiling fan. The color indicates that it is a ground wire and the function of this wire to keep the device safe from undergoing power surges.
In addition, do not use it as the neutral wire despite connecting to the same bus at the same panel.
You need to know that some of the ceiling fans also have a blue wire. Use it for the light if you are installing a ceiling fan with lights.
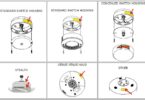
How to Install a pre-wired Ceiling Fan with Several wires
The first step to install a ceiling fan is to have an idea about the wire colors, as given above. It also includes the ceiling fan speed wire colors. After doing so follow these steps:
- Firstly, begin with turning off the power at the main or circuit breaker box.
- Take the bracket for the ceiling fan box and put all wires from the home wiring or ceiling through it. In this setting, the colors of the wires are white (neutral), green (ground), black (hot wire), and brown (hot wire).
- Attach the bracket on the ceiling with the help of the screws that came with the ceiling fan.
- Make sure you tighten the bracket on the ceiling well to avoid creating a wobble when the fan turns around.
- Grab your fan with the blades on and slide it through the groove of the bracket.
- While it is on the bracket, you will not have to hold it while connecting the ceiling fan wires.
- If your ceiling fan is designed with four wires, check their colors code again.
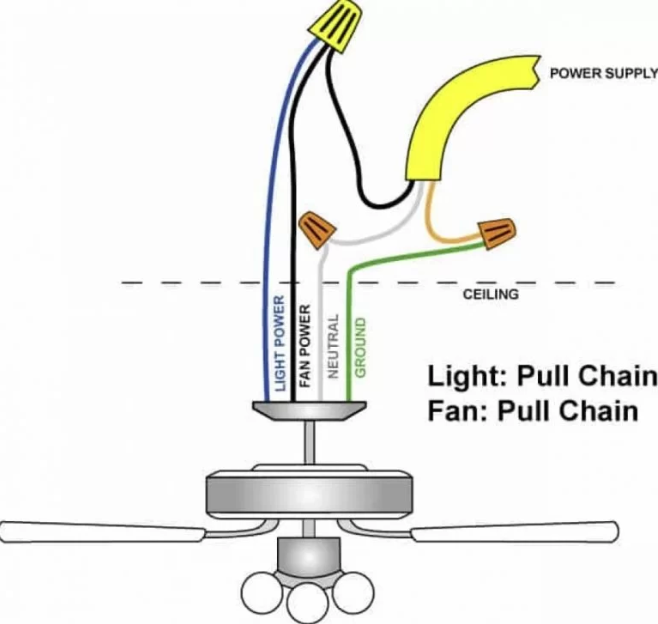
- In this case, buy a fan with green (ground), blue (hot for the fan) white (neutral), and black (hot for lights) wires.
- If you want to run both the fan and the light on one switch, twist the blue and black wire from the unit together.
- First of all, engage the neutral and ground wires. The ground should be coming off of your frame. Now, connect the neutral wires from the ceiling and fan together.
- Engage the hot wires that you have already twisted to the black wire coming out of the ceiling fan.
- While completing the 4 wire ceiling fan switch wiring of your unit, make sure to connect the black wire to the black and blue wires of the fan. You can also connect the blue wires or the blue to the black wire. If your ceiling fan does not have lights, the same step will be applied.
After engaging all the wires, push them back in the bracket and put the faceplate up. Make sure to go through the manual and follow it if you want to wire a ceiling fan with light with 3-way switch.
Wiring your ceiling fan made easy!
Before the installation of a ceiling fan, the first thing to ensure is to understand the ceiling fan wire colors. After getting knowledge of several ceiling fan installation wire colors, it will be easier for you to identify the purpose and function of each wire. If you are unable to understand it, we prefer you hire an expert for this task.
Related guides