Contents
How to Connect a Flush Mount All By yourself
You do not have to hire a professional to add new fixtures to your space. check our DIY tutorial to know how to replace a ceiling light.
To upgrade the beauty of your home, DIY projects are the ideal method to do and it also boosts the value. Upgrading your flush mount ceiling light fixtures is one of the easiest tasks to do the home improvement. However, some lighting projects may need a certified electrician, changing the old ceiling lights can be managed by most people by following simple and right instructions. You might be afraid of involving in the electricity work, so you need to ensure that you follow the safety tips. Go through this guide to learn how to replace your flush-mounted ceiling lights.
Tools Needed For Installing Flush Mount Ceiling Lights:
Before you get started with the installation, you need to gather all the necessary tools that you will require to complete this job. Replacing a flush mount ceiling light is a simple task, and so is the list of tools that you require.
Tools Needed:
- A flat head and Philips screwdriver (to make the job faster, get a power screwdriver)
- A small adjustable wrench
- Flush mount ceiling light
Safety Tip: Before you start, switch OFF the power to prevent the electricity in the fixture.
How To Safely Turn Off The Power:
Before starting, it will be wise to ensure all the power to the light fixture is switched off. Access your breaker box which can be found in the garage or laundry room. Take a look at the list inside the door, it will show you the names of areas in your house, and each of them will contain a number. Locate the number of the room in which you are working, and locate the breaker switch of that area/room and turn it OFF by pushing it. this process will switch off the power specifically to that room. Be sure by rechecking it by flipping the light switch for the fixture. Never depend on the light switch to switch off the electricity.
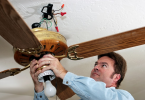
How To Remove An Old Ceiling Light:
After turning off the power, remove the old ceiling light. Unscrew the screws or a finial to remove the cover or glass globe. After that, detach it from the ceiling, take it down after disconnecting the old wires.
Disconnecting The Wires:
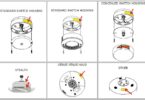
- Usually, the light contains two screws that hold the light to the ceiling plate or a center post using a nut. Gradually, unscrew them and lower the light a few inches.
- A box with thick wires can be found inside the ceiling, typically it is a white or black. Unscrew the wire nuts after pulling the wires out; now untwist the wires to free them.
- The third one is bare wire which is a ground wire, you have to be careful to unwind it. (if the old fixture is devoid of a ground wire, don’t worry the new one will have it.)
- Now, you are done with the old fixture and it is entirely disconnected and you can set it aside.
- After that, remove the old base plate which usually seems to be a flat bar going across the box but it may be a round in shape. Now, you have an open box and wires are hanging down out of it.
Pro Tip: Take a snapshot of wire connections for future reference.
You should be aware of the color of key wires:
- White (neutral)
- Colored usually Black (hot)
- Brass or green color (ground)
How To Wire A Flush Mount Ceiling Light:
Things will get easier if you get an extra pair of hands to hold the light fixture while connecting the wires. Firstly, go through the instructions for your ceiling light to ensure how it is attached to the box. Usually, it is a central post or a pair of screws. You need to ensure that you have the parts within your reach. Before you start attaching it, the connection of the wires should be done first.
Get the extra pair of hands to hold the light fixture a few inches below the ceiling while you are making the connections to the wires. How will you connect the wires? White and black wires’ ends contain a bit of exposed copper wire, which you twist firmly together and cap tightly using a wire nut.
Connecting The Wires:
- Screw the base plate from your new light kit in the ceiling box and make sure the screws are tight enough to avoid the falling of the light fixture.
- Make a connection of the white from the light to the white wire available in the ceiling box. After that, push them into the box.
- Make a connection of orange or black wire from your light to the orange or black wire inside your ceiling box. After that, push them into the box.
- Make a connection of thin ground wire from the light to the bare ground wire inside the ceiling box and force them to go into the box.
- If the ground wire is not in the ceiling, wrap the thin wire around the small grounding screw on the back plate several times, and secure the screw firmly to hold it.
- Now, ensure all wires go inside the ceiling box.
Pro Tip: Get a friend to help you while you connect the wires.
Ceiling Light Installation Pro Tip!
You need to test the ceiling lights and make sure they are working before installing the shade or glass cover.
Turn on the power from your breaker box. If the light fixture is not turning on, inspect all the wiring connections. But if you have followed all the necessary steps in this article, your flush mount light fixture will be working fine. Complete the installation by putting the shade or light cover.
After that, give a high-five to your buddy and enjoy your new flush mount ceiling light.
Related Guides: